
| I am starting a new project - and it is one I can share with you. :D. My nieces are getting married and I wanted to make them something. After lengthy discussions, we have decided on a crocheted version of "Twister". Rather than the traditional 4 rows of 4 colours we are going for 6 rows of 6 colours chosen to compliment their wedding colours and we are going for dice rather than a spinner. If this works out, it may well end up as a new pattern, we just need to think of a name for it. |
 |

Click on the pictures to visit my online shops.

Crochet Patterns Craft Supplies
Monday, February 05, 2018
Friday, December 22, 2017
Kiss Me Quick
 |
Meet "Kiss Me Quick". The CAL will start in March 2018 and full details will be available in January on |
Sunday, March 12, 2017
Mini Flowers
Block 5.
 This is actually the first block I designed for the Secret Garden but after discussion with the testers, we decided to go with a different order.
It is made with 9 mini blocks which are joined as you go. As always, please read the instructions carefully and refer back to the notes where necessary.
For more information go to the CAL web page.


It is made with 9 mini blocks which are joined as you go. As always, please read the instructions carefully and refer back to the notes where necessary.
For more information go to the CAL web page.
Thursday, March 09, 2017
Just a few balls of yarn........
Having chosen the colours for the new CAL and finding out that Stylecraft prices are going up, I decided to get some in ready. I know I haven't started it yet (still working on this *&^%$£* commission) but it just seemed like the best thing to do in current circumstances.
He came home Friday evening and took something upstairs and put it on the spare bed. On Saturday I asked if he had noticed anything.
"Why, what have you done?"
I didn't tell him. It turns out that he hadn't turned the light on when he had gone into the room. He went into the room Saturday evening, turned on the light, had a look around then said
"Did you buy a new lampshade?"
 | Last Thursday, the delivery arrived. You know some things you imagine are always bigger when you see them in real life? This delivery was HUGE. Luckily, Kathryn was here. I gave her the easy job of standing there with the clipboard and checking off the packs as I unpacked and sorted them. Then I had the easy job of making lunch while Kathryn took the yarn upstairs. When she had finished, she said "You didn't need to get into your spare room did you? I thought she was joking. |
The afternoon was spent working on the computer. That evening I decided to go and organise the spare room. Kathryn had not been joking. It took me well over an hour to sort and stack the yarn. It is now all stacked neatly against the wall. You can get into the room and use the spare bed. However, if I have more than one visitor, they are going to have a yarn mattress. The best bit of all of this was my son. He is away in London all week for college. |  |
"Why, what have you done?"
I didn't tell him. It turns out that he hadn't turned the light on when he had gone into the room. He went into the room Saturday evening, turned on the light, had a look around then said
"Did you buy a new lampshade?"
Sunday, February 26, 2017
You know how much I like to tease?

Partly because I have enjoyed the Secret Garden so much and partly because I am a sucker for punishment, I am planning another CAL - Space Odyssey.
Here are the colours I have chosen.
Saffron, Spice, Copper.
Teal, Aspen, Sage.
Cloud Blue, Aster, Royal.
Silver, Graphite, Black.
White, Lipstick.
More Butterflies
Block 4.
 An important thing to be aware of is that it changes from rounds to rows and back to rounds.
You need to use a lot of numbered stitch markers on the butterfly. I suggest you use different coloured yarn and make a list giving each colour a number. The wing tips are attached through the bottom layer only. All other marked stitches are attached through both layers.
For more information go to the CAL web page.
Birthdays, Butterflies and Frogs.
Yesturday was my birthday. It was also the first Yarn Yard open day of 2017.
It was not as busy as I had hoped but I had some customers I hadn't seen before and gained two new students. That made it quite a successful day as far as I am concerned.
The next one is on April 8th so make sure that you put it in your Diary.
 | Benjamin made me some gorgeous Butterfly earrings. He is studying at the Goldsmiths Centre in London and used some of his work experience time to make them. |
| Heather made me a cake. Those of you who crochet will understand the theme perfectly! The open day went well. I had a few visitors who had come for my birthday rather than the yarn. |
 |
The next one is on April 8th so make sure that you put it in your Diary.
Sunday, February 12, 2017
Following on........
Block 3.
 The large flower is made in a sinilar way to the dragonfly which is why I chose this one next.
For more information go to the CAL web page.

For more information go to the CAL web page.
Tuesday, January 31, 2017
Lupus and the Secret Garden.
 |
I am donating the DK version of the Secret Garden to Lupus. I have decided that the best way to raise money from is is with a prize draw via Just Giving. This way people from all over the world can take part and we can get lots of money. You can join in by visiting my Just Giving page. There is no minimum donation. For every £5 you donate, you will receive one entry into the prize draw. Please make sure you leave your full name and email address to enter. |
Sunday, January 29, 2017
Block 2 is here.
I decided to release it a day early, mainly because I am at home all day to answer and questions.
 This one is a Dragondfly. Again, it is made in all four colour ways
For more information go to the Secret Garden web page.


For more information go to the Secret Garden web page.
Monday, January 16, 2017
And we are off!
The long awaited first block of the Secret Garden was released today.

This one is a daisy with four small butterflies dancing around it. Each block is made in four different colour ways.
For more information go to the Secret Garden web page.

This one is a daisy with four small butterflies dancing around it. Each block is made in four different colour ways.
For more information go to the Secret Garden web page.
Wednesday, August 24, 2016
Cover girl
 | WooHoo! Great news I made the cover of Inside Crochet issue number 81 and not just a small photo but the main image. For the lovely yarn I used please go to my online shop below I have made some suggestions of possible colour variations. Dont forget to share pictures of your completed sunrise stole on my facebook page as I would love to see them. |


Thursday, April 28, 2016
Twit twoo luggage
 | Issue 77 Inside Crochet you will find my Magical Owl bag pattern |
 |  Full kits are in either DK or Natura at my online store |
 | I would love to see your completed bags, so please post pictures on my facebook page. |
Sunday, February 01, 2015
Friends of Rainbow Valley - Rainbowlicious Yarns
This is something new I am trying out. Each month I will be asking a friend of Rainbow Valley to us tell about something fun. The first guest blogger is Laura from Rainbowlicious Yarns.
I am very honoured to have been asked by Rainbow Valley Crochet to write an article for her blog.
One of the reasons I started hand dying myself was because I really love long colour changes and couldn't readily find them. I specialise in long colour change rainbows and sock yarns that self-stripe when knitted, I mostly use Merino wool blends as I only like the really really soft wool. For years I didn’t knit or crochet with anything other than cotton or acrylic as I found most wools scratchy and itchy, then I found merino and fell in love with it :-) The yarns I sell on my website are mostly Merino based, Merino/Nylon, Merino/Tencel, Merino sparkle and my favourite is Merino/Bamboo, it is so soft and has the most gorgeous sheen to it, bamboo was one of my favourite fibres to use before I found Merino as it has a lovely drape to it. I also sell some Blue Faced Leicester which is beautiful and soft too and a favourite of some of my customers.
Here is an easy to follow tutorial on how to hand paint a long colour change rainbow on wool. The yarn must be animal fibre or at least 50% animal fibre for this tutorial to work, as Synthetic/Cellulose fibres wont dye with this method. I use items that are easy to get hold of and food safe so great for doing with your children :-)
You can buy the undyed wool from eBay. I recommend buying superwash as there is less chance of felting it as you are dyeing it.
Optional:- Syringe, Sponge painting brush, Measuring spoons.

The first thing I do is knit up the sock blank, this takes the longest time and is the hardest part :-) I have a knitting machine but you could do it by hand. If you knit the yarn up double thickness, you will have two identical balls to make a pair of socks.
Once the blank is knitted, soak it for 30 minutes in a glass bowl in a solution of white vinegar and cold or tepid water. I use approx. 12 tablespoons (180ml) of white vinegar to 1500 ml of water.

Once the wool has soaked, gently squeeze out the excess water.
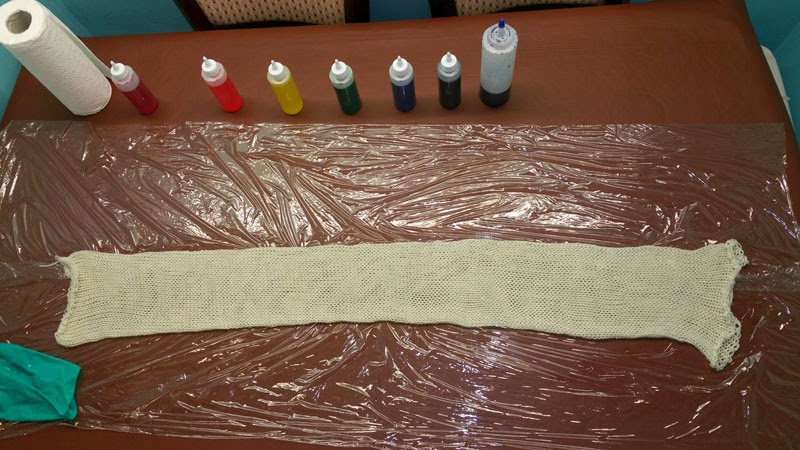
Lay out some Clingfilm on the table with the sock blank on top leaving plenty of Clingfilm all round it.

To make the dyes I use food colouring, you have to make sure they are NOT natural colours. I use Sugarflair paste colours as these are very concentrated, they have a wide range of colours and you only need to use a little bit. You can buy them online or from most cake decorating shops.
Start by adding a small amount (tip of a teaspoon) to approx. 100ml of water, (you can use warm tap water to help the pastes dissolve). The more colour you add, the stronger the colours will be. Mix the colours you want to use with the water. Put them into squeezy bottles or any containers you have if you are using a syringe/sponge brush to paint with. You are then ready to paint your yarn!

This can be done in many ways, different way will produce different effects. This is the fun part, play and see what you can come up with.
You can use a syringe to squeeze colour onto the yarn or use a sponge to press it on or even tip the liquid on little by little.
The colour will soak into the yarn and leave clear water behind. Use the kitchen towel to soak up any excess liquid. If the liquid is clear this is a sign that the yarn can take some more dye if you want it too.

If the liquid still has some colour left in it then the yarn is saturated and taken in all the colour it can.
Repeat the process until you have your desired pattern.


Once you are happy with your design, use the Clingfilm to wrap the yarn making sure there is nowhere for the steam to escape.
Put it on to a microwaveable plate and cook in the microwave on high.
You need to cook it long enough to create steam but not too long as to damage the yarn.
I start with 2 minutes on high, then check it. If it doesn’t look like it has steam inside, I put it on for another minute at a time till I can see steam. This is what sets the colour and stops it washing out.

You can also put the yarn in the top layer of a steamer and leave for 30mins.
After the yarn has cooled down naturally, give it a wash under the tap. Use a little bit of washing up liquid to wash out any leftover dye, rinse until the water runs clear, then leave to dry.
Once the yarn has dried it is ready to use, you can either knit straight from the sock blank or wind into a ball.

Hand-dyed yarn should only be hand washed, there are some care instructions on my website.
I hope you have found this helpful and informative, there are many different ways of hand dying yarns this is just one of the ways it can be done and the amounts and measurements are just my personal preference, Have fun!!
How to Hand Dye Wool using Food Colouring and White Vinegar.
I am very honoured to have been asked by Rainbow Valley Crochet to write an article for her blog.
One of the reasons I started hand dying myself was because I really love long colour changes and couldn't readily find them. I specialise in long colour change rainbows and sock yarns that self-stripe when knitted, I mostly use Merino wool blends as I only like the really really soft wool. For years I didn’t knit or crochet with anything other than cotton or acrylic as I found most wools scratchy and itchy, then I found merino and fell in love with it :-) The yarns I sell on my website are mostly Merino based, Merino/Nylon, Merino/Tencel, Merino sparkle and my favourite is Merino/Bamboo, it is so soft and has the most gorgeous sheen to it, bamboo was one of my favourite fibres to use before I found Merino as it has a lovely drape to it. I also sell some Blue Faced Leicester which is beautiful and soft too and a favourite of some of my customers.
Here is an easy to follow tutorial on how to hand paint a long colour change rainbow on wool. The yarn must be animal fibre or at least 50% animal fibre for this tutorial to work, as Synthetic/Cellulose fibres wont dye with this method. I use items that are easy to get hold of and food safe so great for doing with your children :-)
You can buy the undyed wool from eBay. I recommend buying superwash as there is less chance of felting it as you are dyeing it.
What you need:-
Knitted sock blank, Glass bowl, Non-natural food colours, White vinegar, Squirty bottles/small containers, Clingfilm, Microwave/steamer, Kitchen towel, small spoon, Jug, Washing up liquid, Gloves.Optional:- Syringe, Sponge painting brush, Measuring spoons.

The first thing I do is knit up the sock blank, this takes the longest time and is the hardest part :-) I have a knitting machine but you could do it by hand. If you knit the yarn up double thickness, you will have two identical balls to make a pair of socks.
Once the blank is knitted, soak it for 30 minutes in a glass bowl in a solution of white vinegar and cold or tepid water. I use approx. 12 tablespoons (180ml) of white vinegar to 1500 ml of water.

Once the wool has soaked, gently squeeze out the excess water.
Lay out some Clingfilm on the table with the sock blank on top leaving plenty of Clingfilm all round it.
To make the dyes I use food colouring, you have to make sure they are NOT natural colours. I use Sugarflair paste colours as these are very concentrated, they have a wide range of colours and you only need to use a little bit. You can buy them online or from most cake decorating shops.
Start by adding a small amount (tip of a teaspoon) to approx. 100ml of water, (you can use warm tap water to help the pastes dissolve). The more colour you add, the stronger the colours will be. Mix the colours you want to use with the water. Put them into squeezy bottles or any containers you have if you are using a syringe/sponge brush to paint with. You are then ready to paint your yarn!

This can be done in many ways, different way will produce different effects. This is the fun part, play and see what you can come up with.
You can use a syringe to squeeze colour onto the yarn or use a sponge to press it on or even tip the liquid on little by little.
The colour will soak into the yarn and leave clear water behind. Use the kitchen towel to soak up any excess liquid. If the liquid is clear this is a sign that the yarn can take some more dye if you want it too.

If the liquid still has some colour left in it then the yarn is saturated and taken in all the colour it can.
Repeat the process until you have your desired pattern.


Once you are happy with your design, use the Clingfilm to wrap the yarn making sure there is nowhere for the steam to escape.
Put it on to a microwaveable plate and cook in the microwave on high.
You need to cook it long enough to create steam but not too long as to damage the yarn.
I start with 2 minutes on high, then check it. If it doesn’t look like it has steam inside, I put it on for another minute at a time till I can see steam. This is what sets the colour and stops it washing out.

You can also put the yarn in the top layer of a steamer and leave for 30mins.
After the yarn has cooled down naturally, give it a wash under the tap. Use a little bit of washing up liquid to wash out any leftover dye, rinse until the water runs clear, then leave to dry.
Once the yarn has dried it is ready to use, you can either knit straight from the sock blank or wind into a ball.

Hand-dyed yarn should only be hand washed, there are some care instructions on my website.
I hope you have found this helpful and informative, there are many different ways of hand dying yarns this is just one of the ways it can be done and the amounts and measurements are just my personal preference, Have fun!!
Thursday, January 22, 2015
Last Christmas...........
.....I had a full set of Clover Amour.

|
My son connived with a friend. I had half the set from him and the other half from her. I would show you the full set but they are scattered about in various projects, as any good hook should be. |
This Christmas, my son bought me some beautiful hand made candle stick holders.
Not that I plan to use them for candles but they will make beautiful bud vases for when I finally get all those crocheted flowers done.
|
So, I treated myself. A new set of Clover Amour, thread ones this time, in pastels to match the bright colours of the larger sizes. The only reason you get to see the full set is because they only arrived last Friday and the projects I am current working on are yarn not thread. |
 |
Soon, they will be scattered about in various projects.
And did you know, they come in bigger sizes now!
Saturday, January 17, 2015
Back to Crocheting
A whole load of events, over which I had no control, seemed to take over last year.
First there were the Distance selling regs which meant I had to re-evaluate the way I ran the website. With Ravelry not being able to provide a shopping cart which complied with the regulations, I had to change my instant download provider.
Then came the EU VAT. More changes to the website but many of which could no be done until the last minute due to not having clear guidelines to follow.
All of this meant no new patterns!!!!!
 |
That is set to change this year. My first pattern is finished already! This Tiger blanket (no, not a Zebra) was designed in collaboration with one of my students, partly as a learning exercise. She is making hers in orange and black DK. I just used some yarn I had in my stash which happened to be cream and grey aran. It is worked in 3 panels, with the middle one being flipped over to match up the stripes before they are sewn together. |
|
Short rows are used to make the wiggly stripes. These also make for an interesting pattern on the background. The pattern is just the first four stripes which are repeated. Because is is designed this way you can make it as big or as small as you wish. And in any type of yarn. The pattern is currently with testers and translators. Watch this space for when it will be available. |  |
Sunday, August 17, 2014
Posh Jewellery Stands.
I went to the "Festival of Quilts" at the NEC last weekend, while I was in Penarth visiting my parents. Knowing that anything I bought would have to fit in my case to be brought home via the London Underground, I had no intentions of buying anything.
But fabric is so much more compact than yarn!
I bought a 3 metre piece of lovely cotton with the plans to make a new skirt and top set. That is the floral piece in the background.
|
Then I saw this stunning hand dyed fabric. Very expensive but soooooooo gorgeous. It is made by Farbstoff. The lady was lovely and spent ages helping me find the right colours. Originally I was looking for a pice to photograph my work on but I ended up getting two pieces, the second one to make jewellery stands with. |

|
Yes, I know they are going to work out very expensive jewellery stands but I need something special for when I finally get around to designing the silk jewellery.
I used a template I found online. Stella & Hodge show you how to make some simple stands that fold flat. They make theirs from card. The template is perfect for what I wanted to do. I just wanted them posher.

| I had also bought some very thick interfacing at the show. I went stash diving and found the Bondaweb and then I was ready. |
| As interfacing doesn't score and bend like card, I cut one full piece. The second piece was trimmed just inside the dotted lines of the template so that the pieces didn't touch. |

|
 |
I ironed the pieces all together and then got out the sewing machine. I tucked ribbon between the interfacing and the fabric. I did a single line of stitching, from the back, along the centre of the gaps in the second layer of interfacing. |
|
As my machine does embroidery stitches, I used some to decorate either side of the lines. This was done from the front. This is partly to make it pretty and partly to make sure the interfacing stays firmly in place. I know from exereience that as Bondaweb get older, it loses its "stickiness". I do not want my stands falling apart while on display. |

|

| Finally, fold the hem over, sew a single line of stitching from the back to hold it all in place. Then a decorative row just inside from the front. |

I only had enough interfacing for 3 stands so bought some iron-on interfacing to make the other two. It was no where near as thick so I used three layers to build it up. This way worked out a lot cheaper than the using the thicker interfacing and Bondaweb, it just meant more cutting out to do.
If I make any more, I would just use one layer for the full template and build up the strength in the separate pieces. This will give a much sharper fold line and make them sit better. I would also use thinner ribbon and magnetic catches in stead of having to ties bows each time.
Now all I have to do is design the silk jewellery to display on them.
Subscribe to:
Posts (Atom)